Chapter 9 Procedures, Control Structures, and the Interface, Oh My!
Section 9.1 Custom Procedures
Almost all of our time in Racket was spent writing our own functions. The ability to combine existing procedures into new ones is a common feature of programming languages, and NetLogo is no different, we just need to learn the syntax for that. First, we need to venture off to a new section of the NetLogo IDE, the code tab. This is the area where you will write most of your custom code. Now that we’re in the right place, let’s take a look at the general syntax for NetLogo procedures:
to NAME [p0 p1 p2]
  CODE
end
And here is a specific example:
to setup [n steps]
  clear-all
  create-turtles n
  [
    pen-down
    forward steps
  ]
end
Without
() to enclose all function calls, we need some way to show that lines of code belong together in a custom procedure. This is the purpose of to and end. After to we give the name for our procedure. NetLogo has it’s own particular rules about valid identifiers, but as we discussed earlier, if we stick to upper and lower case letters, and numbers (as long as we don’t start with a number), we’ll be fine. We use [] (brackets) after the procedure name to provide any parameters we may need. If we don’t need any parameters, we can have an empty set of brackets, or omit them entirely.The
setup procedure define above resets the NetLogo world, makes a number of turtles provided as a parameter and has those turtles immediately put their pens down and move forward a number of steps also provided as a parameter. In that example you’ll also see another use of the brackets. When we want to define a separate code block that is part of a procedure, we will always use [] to create that code block. In this case, we’re providing a series of commands (technically, this is an argument to the create-turtles procedure) for the newly created turtles to run.Just like in Racket, we should take care to think about making consistent style choices when writing code. In addition to using meaningful names, newlines and tabs are your friends. NetLogo (the IDE) will help you in this regard, similarly to DrRacket. The first line after a procedure header (
to NAME []) will automatically indent. NetLogo will also indent the first line after an open bracket. NetLogo will also continue to use the same indentation level until a closing symbol is used (like ] or end).With this syntax in hand, we’re ready to start writing our own procedures. There’s just one thing we need to consider, and that is
context. All commands have a context, and our custom procedures will be no different. The first context-dependent line of code in a custom procedure determines the context. The first line of the example above is clear-all, which is an observer procedure, which means that our setup is also an observer procedure. Once the context has been set, you can’t have any out-of-context commands in your procedure. If you don’t use any context-specific commands, then your procedure would be applicable in all contexts.Section 9.2 Control Structures
Subsection 9.2.1 if
Similar to Racket,
if is a statement that allows us to execute some code based on a boolean value. Unlike Racket, if is not a function that returns a value, instead it’s a specific piece of syntax, which is sometimes referred to as a control structure, since it gives us the opportunity to control the flow of our programs. So, let’s take a look:if BOOLEAN
[
CODE
]
And here is a specific example:
if pycor > 0
[
  set pcolor blue
]
Once again, we see the
[] used to denote a code block. The boolean value, or condition can be anything that returns a boolean, including boolean variables, comparison operators, or boolean operators. In the example, all the patches on the top half of the world, or those with positive pycor values, will become blue. Notably, all of the other patches will do nothing.
Subsection 9.2.2 ifelse
Another difference between the
if function we used in racket and NetLogo’s if is that the NetLogo version does not allow us to provide alternate code in the event that the boolean condition is false. Instead, NetLogo has a separate structure, ifelse.ifelse BOOLEAN
[
CODE0
]
[
CODE1
]
And here is a specific example:
ifelse pycor > 0
[
  set pcolor blue
]
[
  set pcolor brown
]
The main difference between
ifelse and if (aside from the name), is a second code block. When the condition is true, the first code block is run, when the condition is false, the second code block is run. In the example above, all the patches on the top half of the world (positive pycor values) will turn blue, while the patches on the bottom (negative and 0 pycor values) will turn brown.
Subsection 9.2.3 repeat
In Racket, the only repetition we saw was using recursion, or calling functions within their own definitions. Another style of looping in computer science is called iteration, which is just repeating the same steps multiple times. There are a few different ways to create iteration in NetLogo, the first we’ll look at is
repeat.repeat n
[
CODE
]
And here is a specific example:
repeat 4
[
  stamp
  forward 3
]
As you can probably guess,
repeat runs the provided code block n times, where n is a positive integer. In the example provided, turtles will leave 4 stamped images as they move forward 3 steps at a time.Section 9.3 Custom Interfaces
While the command center can be very useful for testing out procedures, NetLogo also gives us the ability to use other kinds of interface elements to control our programs. In many languages, the ability to create things like buttons, sliders, menus, etc. is at best painstakingly annoying. Thankfully, NetLogo makes this stuff fairly straightforward.
To add an interface element you can either right-click anywhere outside the NetLogo world area, or select the element type from a menu above the interface area: 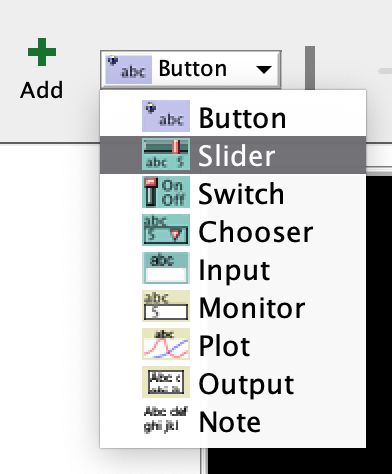 After selecting the element you want, the Add button will be highlighted and you can click anywhere in the white space outside the NetLogo world to place the new element. A window will pop up allowing you to configure the new element.
Subsection 9.3.1 Buttons
Buttons are interface elements attached to procedures. Clicking a button will run whatever command you set. When you make a button, you’ll see the following window: 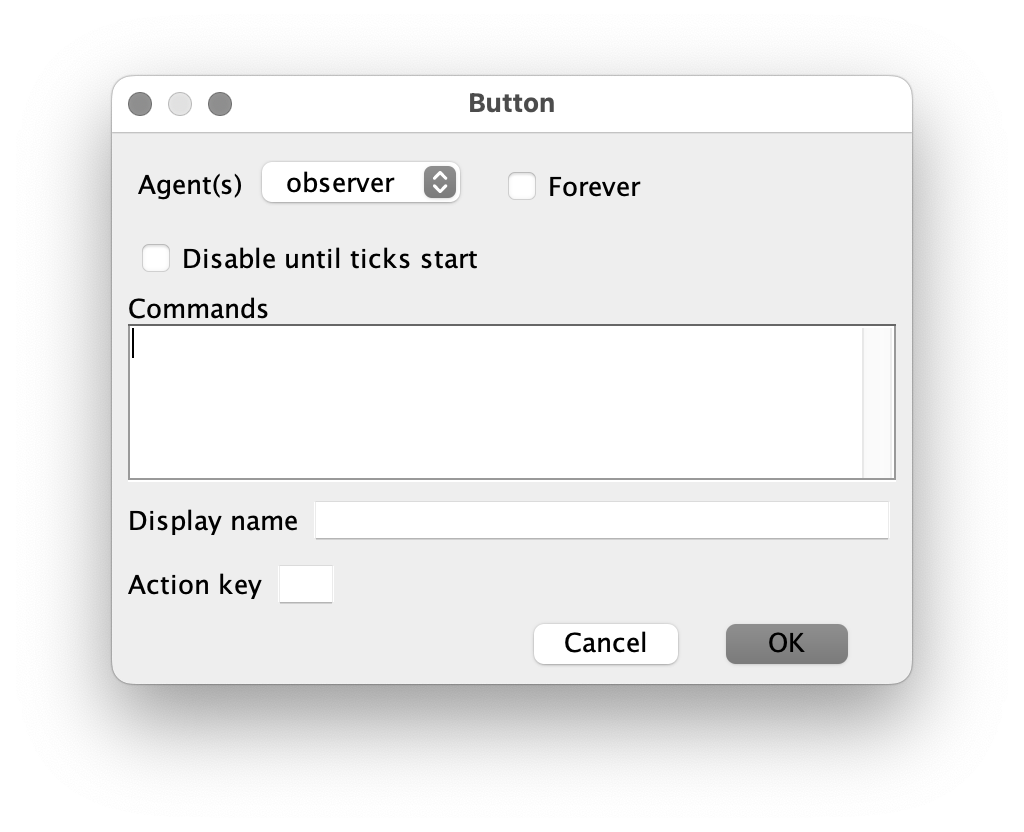 As we can see from this image, there are a number of features we can set when making a button:
- Commands: The largest part of this window, this is where we provide the commands to run when the button is activated. In theory, we can enter a lot of commands here. In practice, it’s better to minimize the amount of code in this section. We should try to keep a button attached to a single procedure call, that way we can always find our code in the Code tab as opposed to being hidden inside a button.
- Context: We cannot forget about context, and buttons are no exception. We have to select the context to run the provided command(s) from.
- Display name: By default, a button will display the commands provided, if we want something else instead, we can set that here.
- Action key: We can allow users to run a button by typing a key on the keyboard if we set an action key. Action keys must be printable characters (so things like the arrow keys won’t work). If we set a letter, the upper or lower case version will invoke the button.
- Forever: Once triggered (either by click or action key), a forever button will run its commands until it is triggered again. It is common practice to use forever buttons to control NetLogo programs. (For example, a game may have a forever play button that must be invoked in order to run the logic for that game).
Subsection 9.3.2 Sliders
Sliders allow us to control the value of global variables. A global variable is a variable that we can access anywhere within our code. By attaching a slider to a global variable, we will be able to change its value while the program is running, without touching the code. 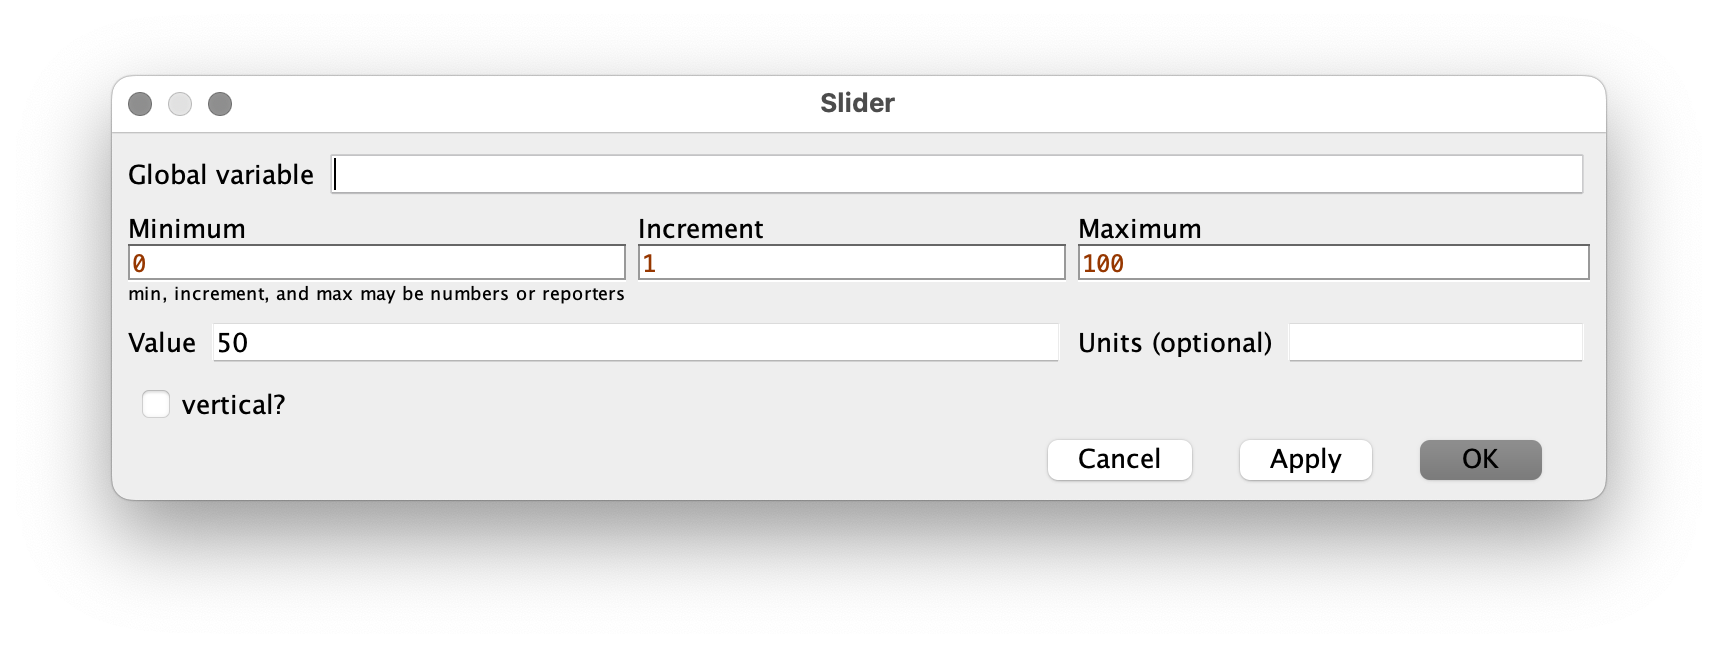 As with buttons, we have a number of settings to work with when making a slider:
- Global variable: The name for our global variable. We should use the normal rules for identifier names here. Once the button is created, we can use this name and always know it will give back the current slider value.
- Minimum: The smallest possible value for the slider.
- Maximum: The largest possible value for the slider.
- Increment: How much should the slider increase/decrease in a single step. The default is 1, but it can be any valid number, including non-integers.
- Value: Initially, this will be the default value for the slider, but it will change to match whatever the current state of the slider is.
- vertical?: Normally, sliders will be oriented horizontally, selecting this will rotate the slider so it will appear vertically instead.
- Units: This is purely for display. If you enter something here, it will show up along with the current value.
